

Jigit Cloud connects GitHub, GitLab, and Gerrit to Jira, surfacing pull requests, branches, and code reviews directly on Jira issues. This guide explains how to install and configure these integrations on Jira Cloud.
Admin access required. You must be a Jira Administrator or Site Administrator to configure Jigit. Access the admin page via Jira Administration > Apps > Jigit.
Installing Jigit
-
Go to the Jigit listing on the Atlassian Marketplace.
-
Click Try it free.
-
Select your Jira Cloud site.
-
Click Review, then Start free trial.
Admin page overview
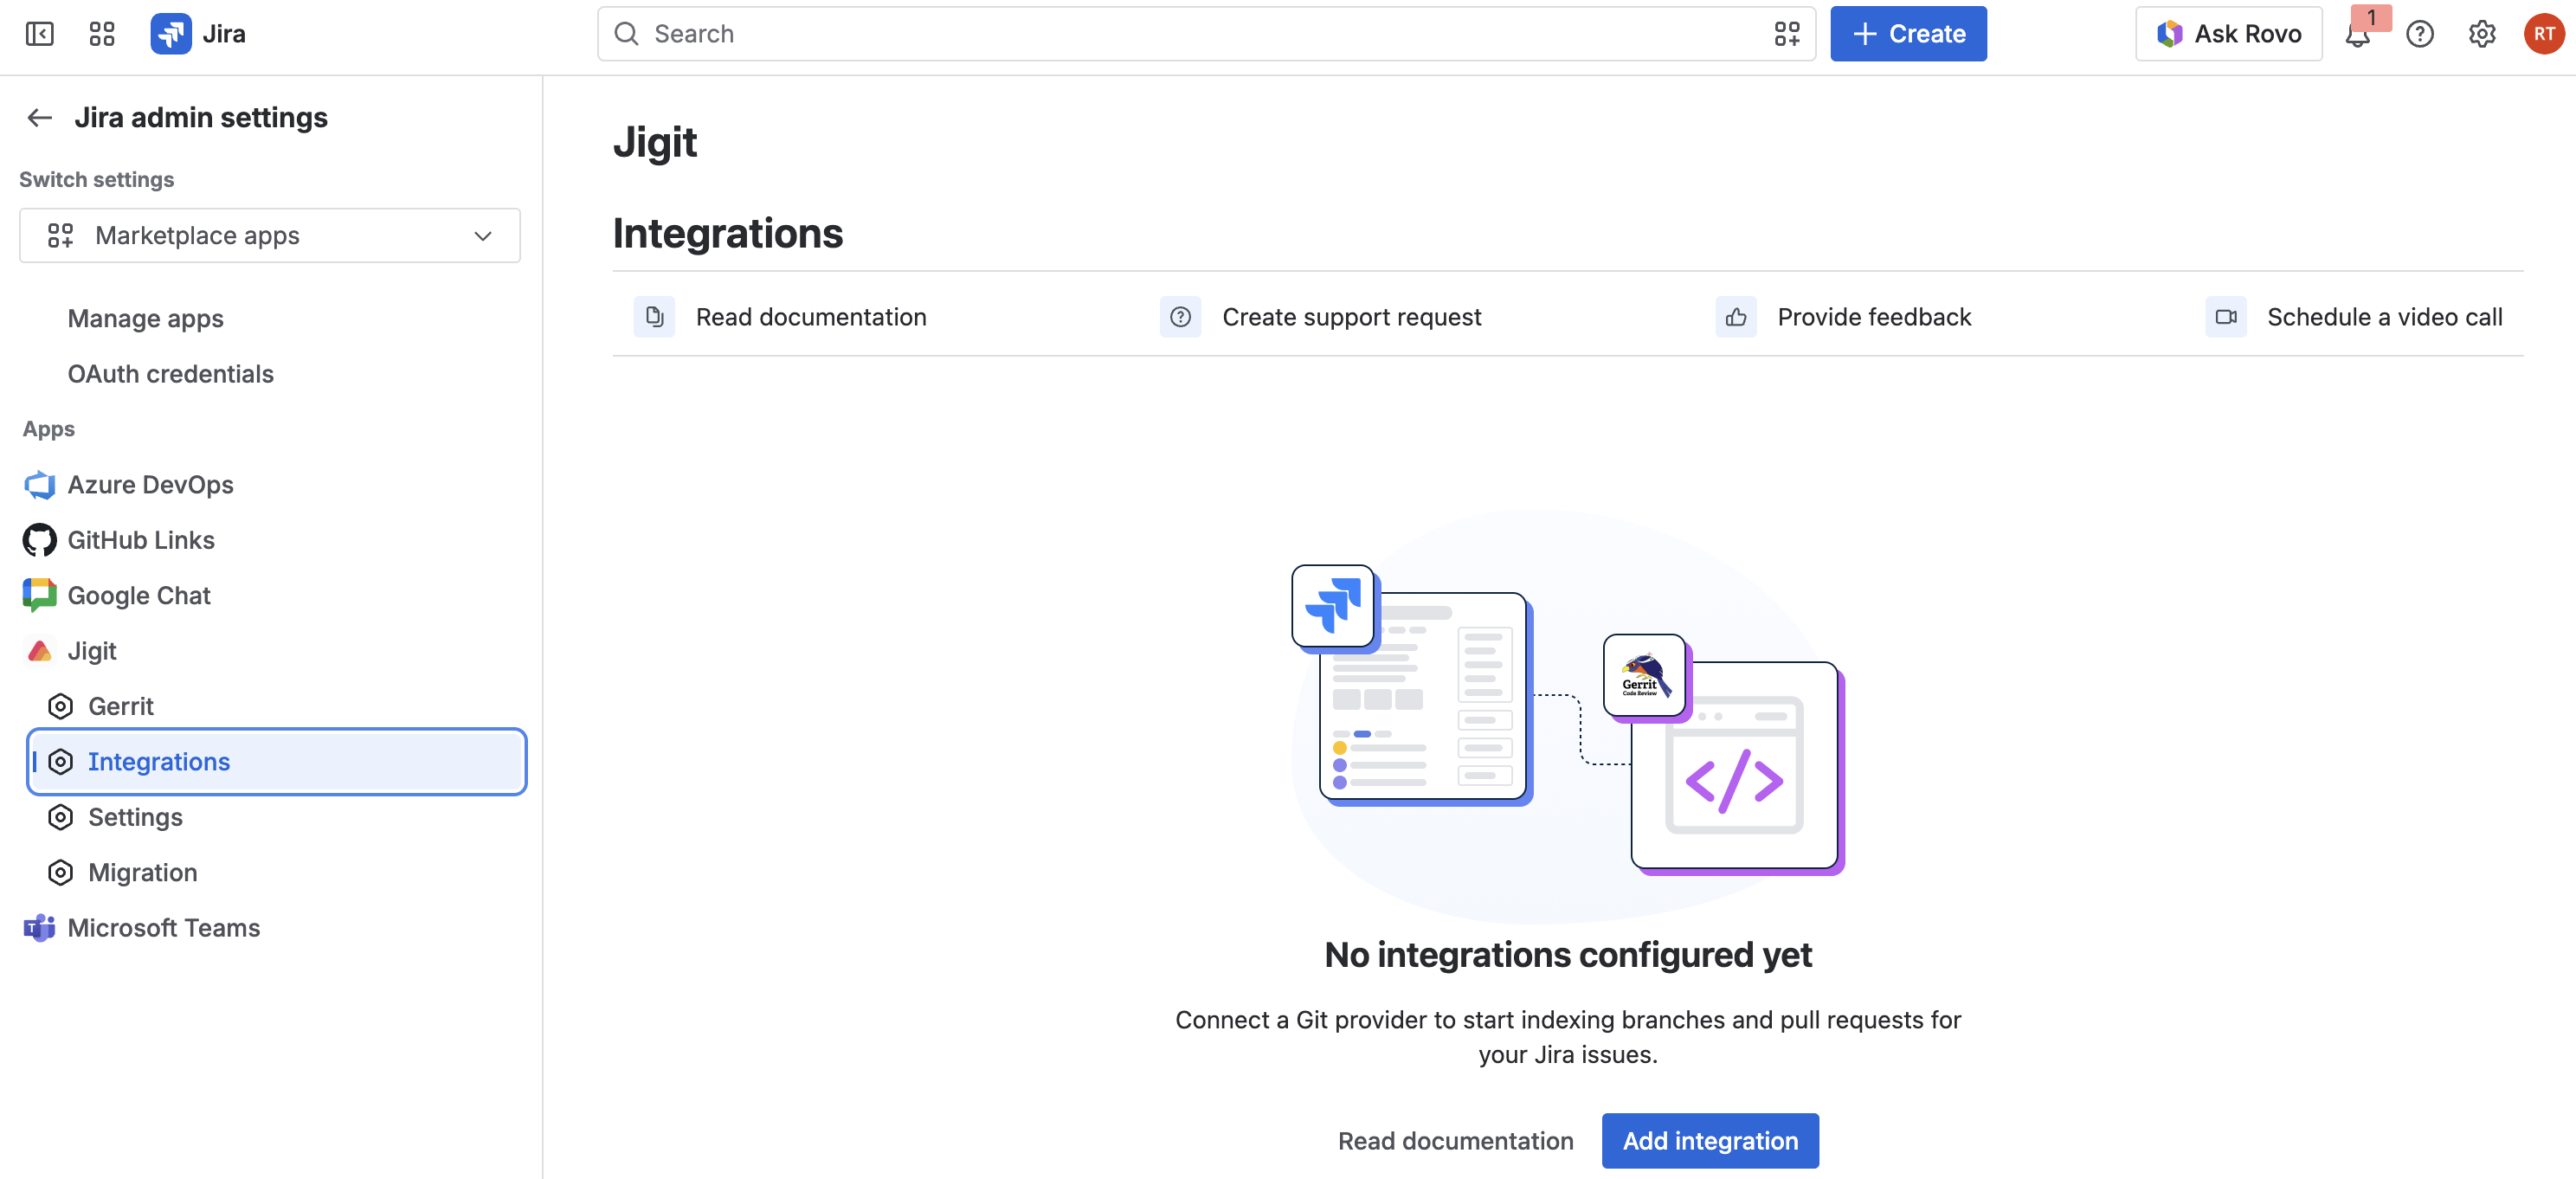
The Jigit admin page has four tabs:
|
Tab |
Purpose |
|---|---|
|
Gerrit |
Add and manage Gerrit Code Review server connections. Linked changes appear in the Gerrit tab in the Jira issue Activity section. |
|
Integrations |
Add and manage GitHub and GitLab integrations (organisation/group or single repository/project). Pull requests (and GitLab merge requests) and branches appear in the Jigit Development panel on Jira issues. |
|
Settings |
Global settings including Jira project scope, branch naming patterns, user authentication strategy, and Git webhooks. |
|
Migration |
Import a configuration export from Jigit Data Center. See the Jigit - Migrating from Data Center to Cloud. |
Configuring Gerrit
Each Gerrit configuration connects Jigit to one Gerrit server. You can add multiple configurations for different servers or environments. Jigit searches Gerrit for issue keys each time a Jira issue is opened - changes are fetched on demand rather than pre-indexed.
Adding a Gerrit configuration
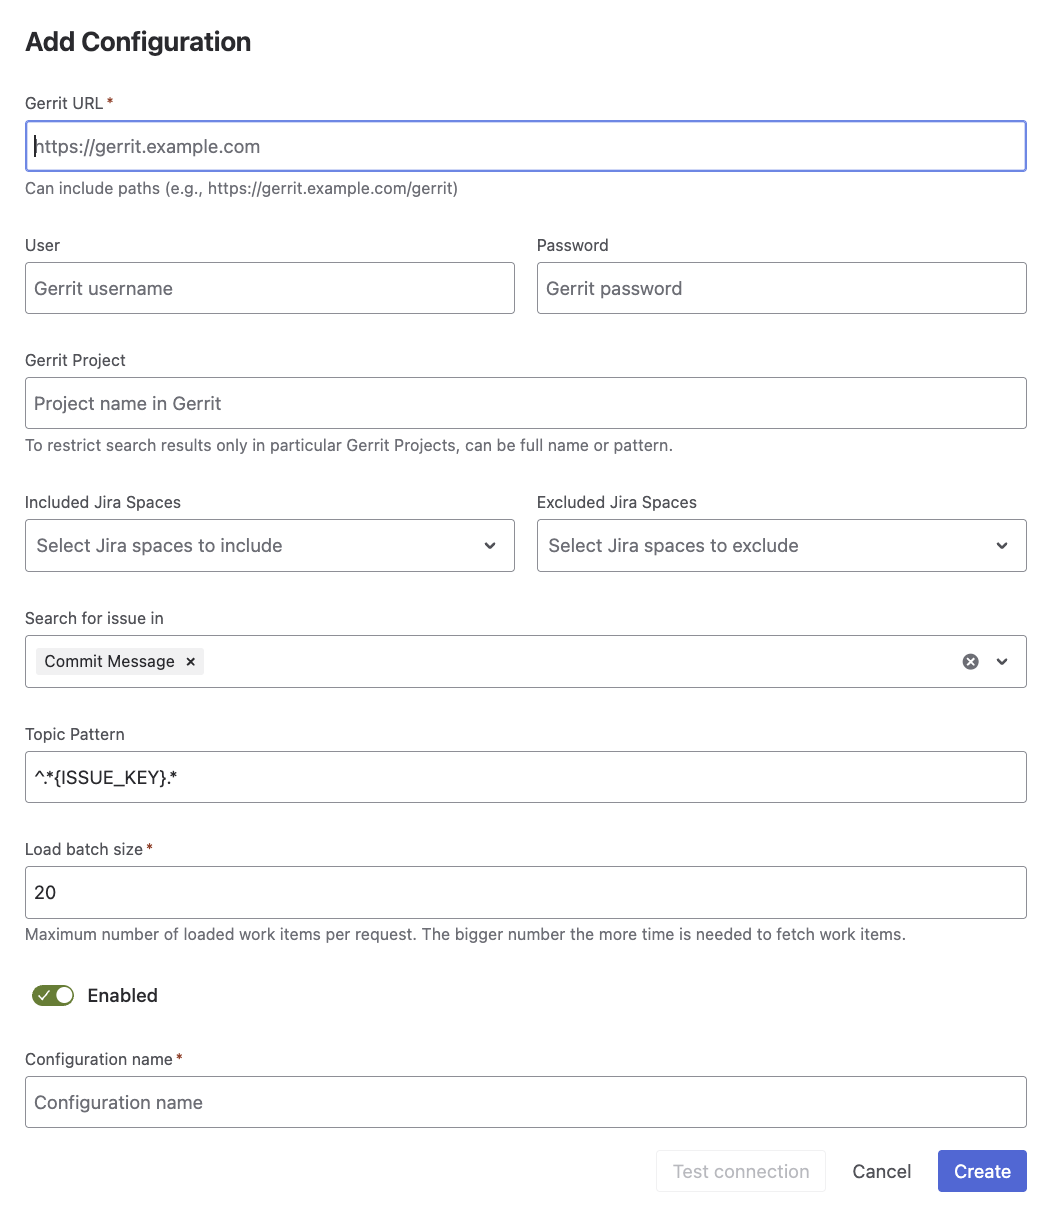
-
Navigate to Jira Administration > Apps > Jigit > Gerrit.
-
Click Add configuration.
-
Complete the configuration form (see field reference below).
-
Click Test connection to confirm Jigit can reach the Gerrit server using the credentials provided.
-
Click Create.
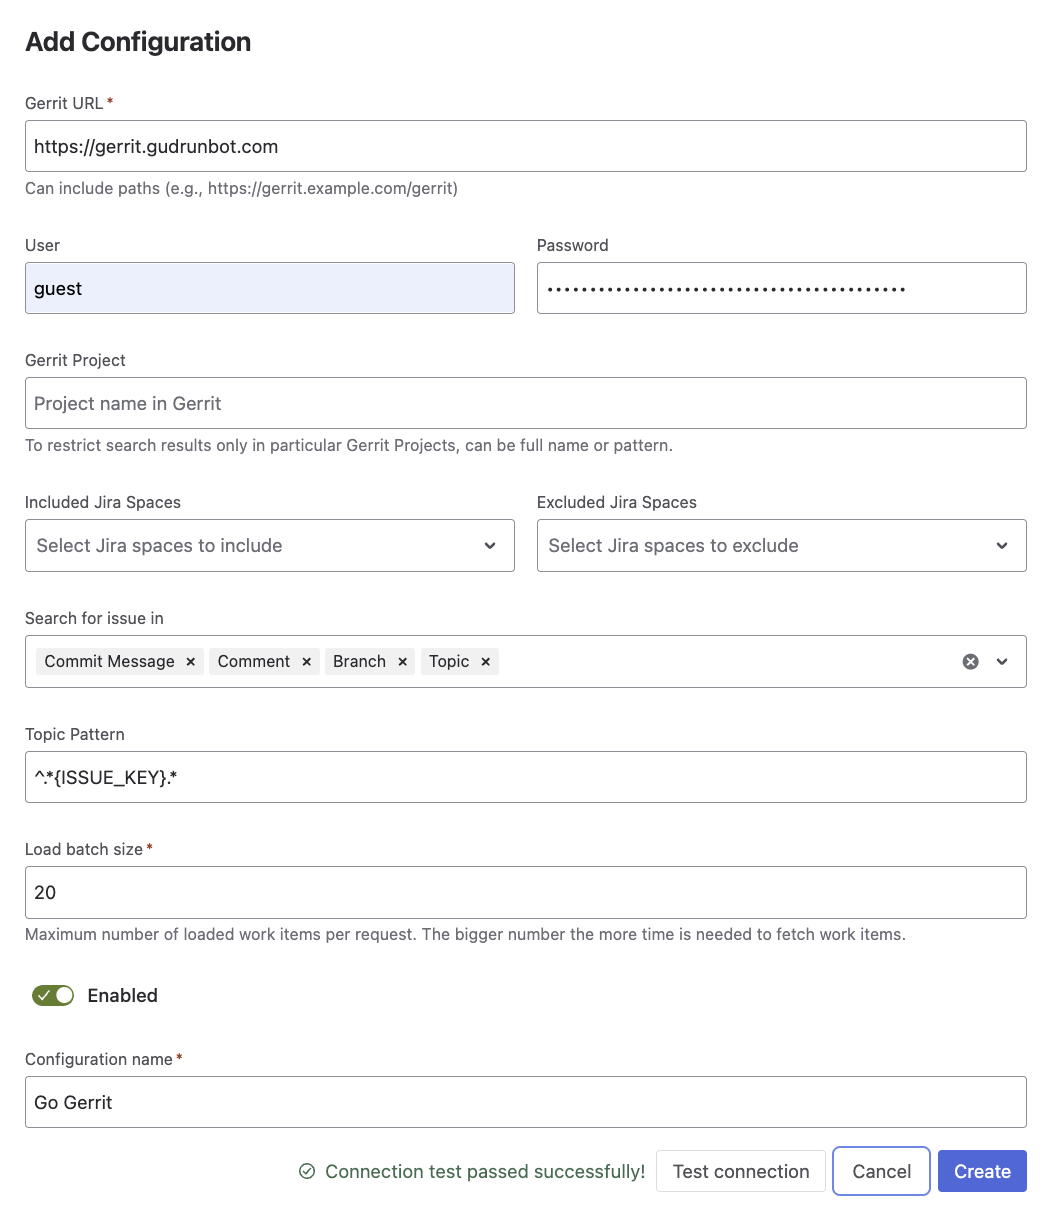
Gerrit configuration fields
|
Field |
Required |
Description |
|---|---|---|
|
Configuration name |
Yes |
A label to identify this configuration in the admin UI, for example Production Gerrit. |
|
Gerrit URL |
Yes |
The base URL of your Gerrit instance, for example |
|
Username |
No |
The Gerrit account username for HTTP Basic authentication. Leave blank for anonymous access to a public Gerrit instance. |
|
Password |
No |
The HTTP password for the Gerrit account. Generate this in Gerrit via Settings > HTTP Credentials. This is not the same as your Gerrit login password. Required if a username is provided. |
|
Included Jira spaces |
No |
Limits this configuration to specific Jira project keys. If empty, all projects are included. Cannot overlap with Excluded Jira projects. |
|
Excluded Jira spaces |
No |
Prevents this configuration from running for specific Jira project keys. Cannot overlap with Included Jira projects. |
|
Search for issue in |
No |
Selects where Jigit looks for the Jira issue key within a Gerrit change. Choose one or more: Commit (commit message), Topic (topic field - uses Topic Pattern), Branch (target branch name), Comment (change comments). Defaults to commit messages if nothing is selected. |
|
Topic pattern |
No |
A regex applied to the Gerrit topic field when Topic is selected above. Use |
|
Load batch size |
No |
Maximum number of Gerrit changes fetched per request when displaying linked reviews on a Jira issue. |
Viewing Gerrit code reviews in Jira
-
Open a Jira issue.
-
Scroll to the Activity section.
-
Select the Gerrit tab.
-
Linked changes are listed per configuration, showing the change subject, status (Open, Merged, Abandoned), and reviewer votes.
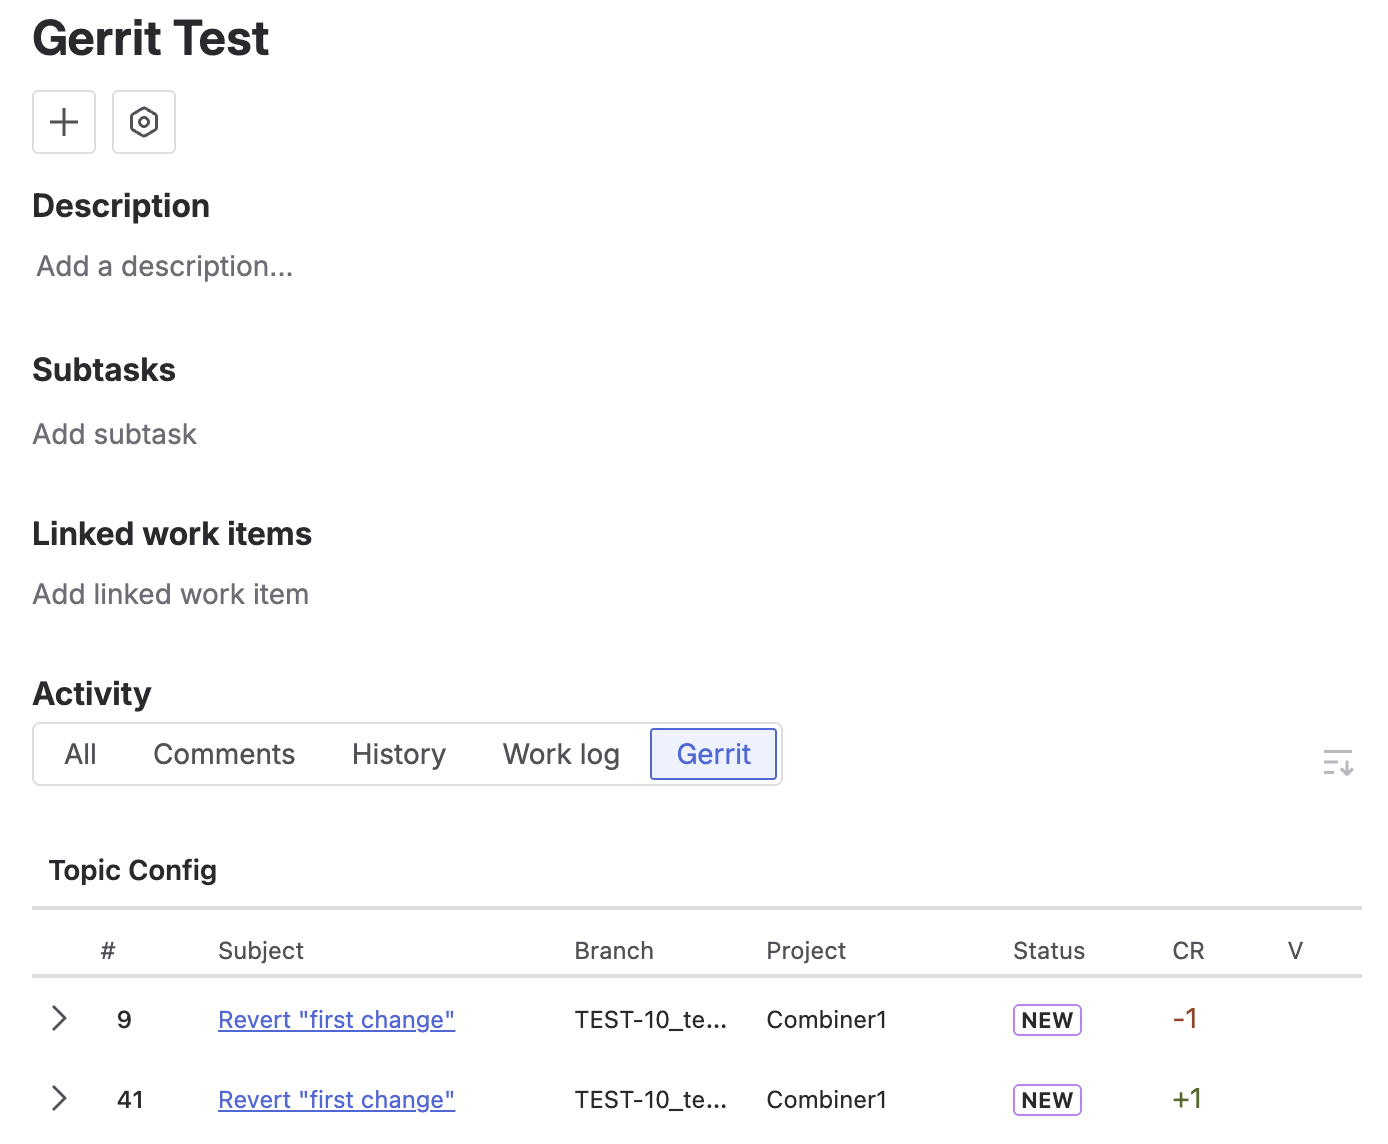
If the Gerrit tab does not appear, check that at least one Gerrit configuration is active and that the Jira project is within scope (not in the configuration's Excluded Jira projects list).
Configuring GitHub (Integrations tab)
GitHub integrations connect Jigit to a GitHub organisation or repository. Jigit runs its indexing process every 5 minutes, but the same repository can be indexed no more than once every 20 minutes. Jigit indexes branches and pull requests and links them to Jira issues using the issue key found in the PR title or branch name.
Authentication types
|
Auth type |
How it works |
Best for |
|---|---|---|
|
Personal Access Token (PAT) |
A GitHub PAT is stored securely and used for all API calls on behalf of the token owner. |
Simple setup. Suitable for smaller teams or when a GitHub App is not available. |
|
GitHub App |
Jigit uses the App private key to generate short-lived installation tokens automatically. Tokens are cached and refreshed without manual intervention. |
Recommended for organisations. Higher API rate limits, granular permissions, and no dependency on an individual user account. |
Integration types
|
Type |
Path format |
What Jigit indexes |
|---|---|---|
|
Organisation |
|
All (or selected) repositories in the organisation account. New repositories can be picked up automatically. |
|
Single repository |
|
One specific repository only. |
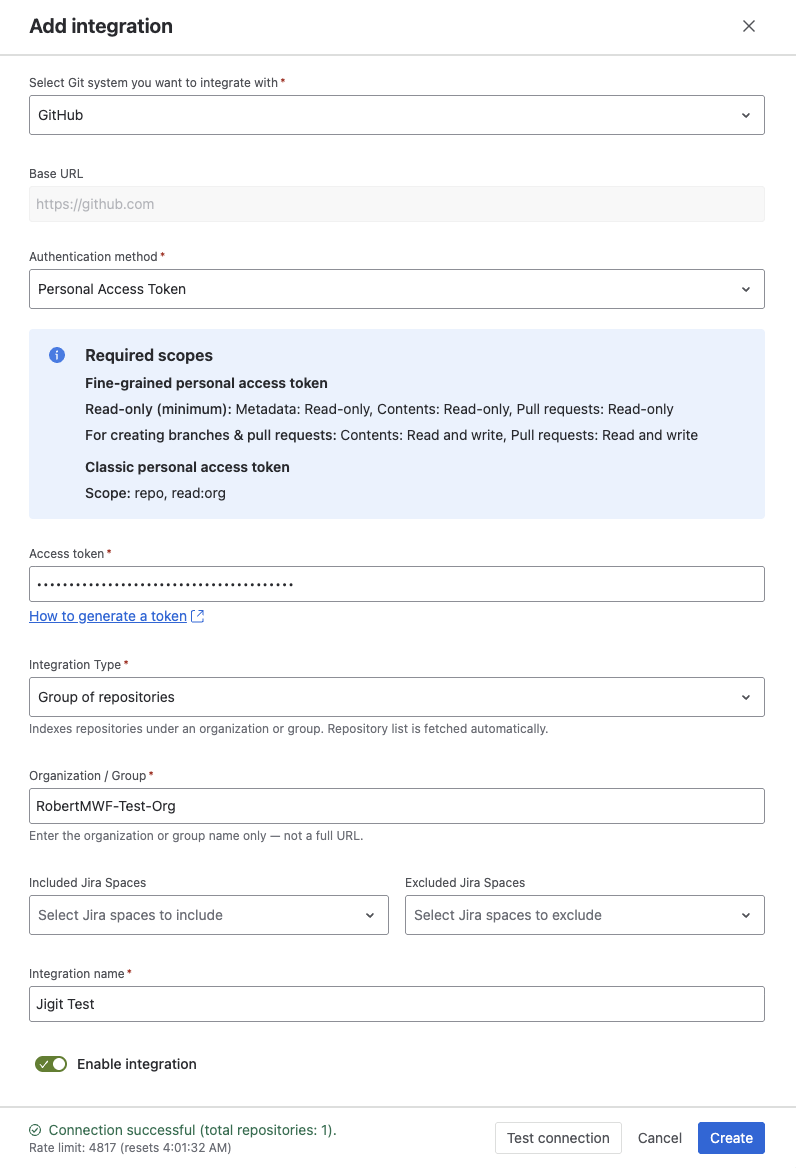
Adding a GitHub integration with a Personal Access Token
Step 1: Create a GitHub Personal Access Token
-
In GitHub, go to Settings > Developer settings > Personal access tokens.
-
Generate a new token (classic or fine-grained).
-
For a classic PAT, grant:
repo(orpublic_repofor public repositories only) andread:org(required for Organisation integrations). -
For a fine-grained PAT, grant Read access to: Contents, Pull requests, Metadata.
-
Copy the token.
Step 2: Add the integration in Jigit
-
Navigate to Jira Administration > Apps > Jigit > Integrations.
-
Click Add integration.
-
Set Authentication type to Personal Access Token.
-
Complete the configuration fields (see field reference below).
-
Paste the PAT into the Personal access token field.
-
Click Test connection.
-
Click Create.
Adding a GitHub integration with a GitHub App
Step 1: Create and install a GitHub App
-
In GitHub, go to your organisation or personal Settings > Developer settings > GitHub Apps.
-
Click New GitHub App.
-
Configure the app:
-
Name: any descriptive name, for example Jigit Integration
-
Homepage URL: your Jira site URL
-
Webhook: disabled unless enabling webhook support
-
Repository permissions: Contents (Read-only), Metadata (Read-only), Pull requests (Read-only)
-
-
Click Create GitHub App.
-
Note the App ID shown on the app settings page.
-
Under Private keys, click Generate a private key. Save the downloaded
.pemfile. -
Click Install App and install it on your organisation or selected repositories.
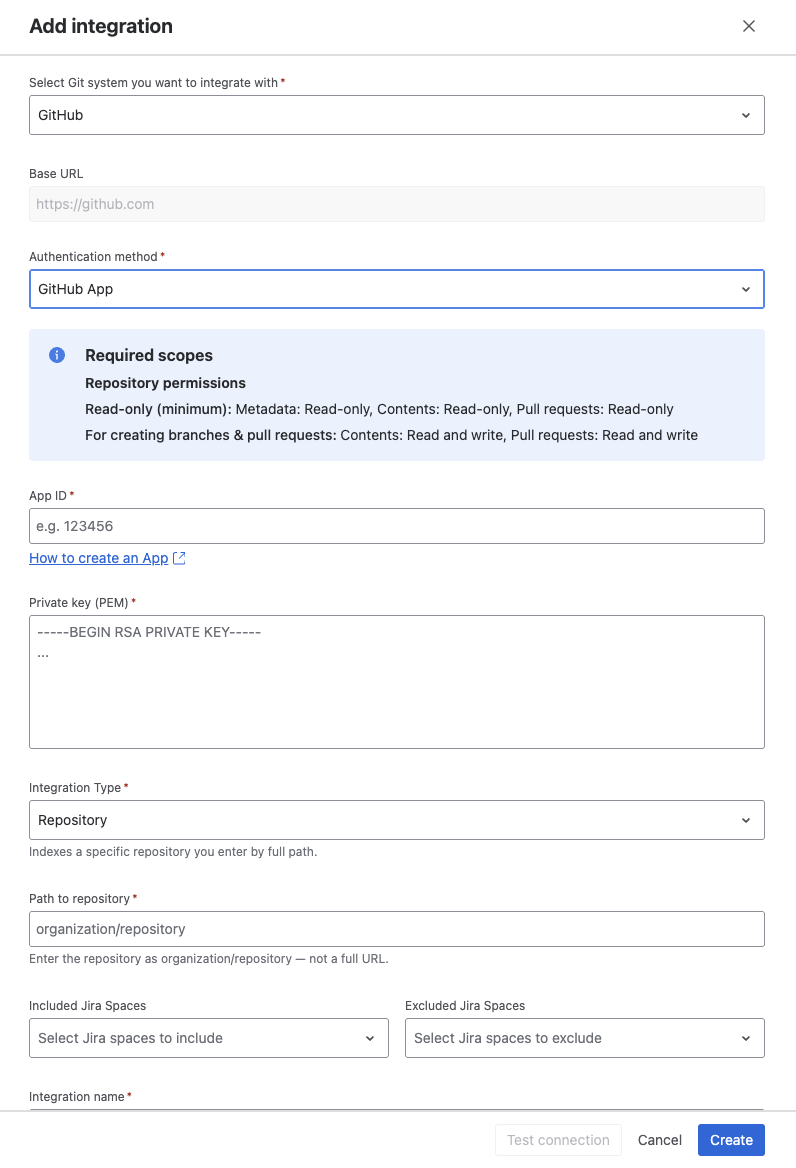
Step 2: Add the integration in Jigit
-
Navigate to Jira Administration > Apps > Jigit > Integrations.
-
Click Add integration.
-
Set Authentication type to GitHub App.
-
Complete the configuration fields (see field reference below).
-
Enter the App ID from the GitHub App settings page.
-
Paste the full contents of the
.pemfile into the Private key field. -
Click Test connection.
-
Click Create.
GitHub App installation tokens are short-lived and refreshed automatically by Jigit. You do not need to rotate them manually.
Configuring GitLab (Integrations tab)
GitLab integrations connect Jigit to a GitLab Cloud group or project. Jigit runs its indexing process every 5 minutes, but the same group or project can be indexed no more than once every 20 minutes. Jigit indexes branches and merge requests and links them to Jira issues using the issue key found in the merge request title or branch name. Linked merge requests are shown as pull requests in the Jigit Development panel, alongside GitHub PRs.
GitLab Cloud only. Jigit Cloud connects to gitlab.com only - self-managed GitLab instances are not supported and are rejected when you try to save the integration.
Authentication
GitLab integrations use a Personal Access Token only - there is no GitLab equivalent of the GitHub App auth type.
Integration types
|
TYPE |
PATH FORMAT |
WHAT JIGIT INDEXES |
|---|---|---|
|
Group |
Group path, e.g. |
All projects in the group, including its subgroups. |
|
Repository |
|
One specific GitLab project only. |
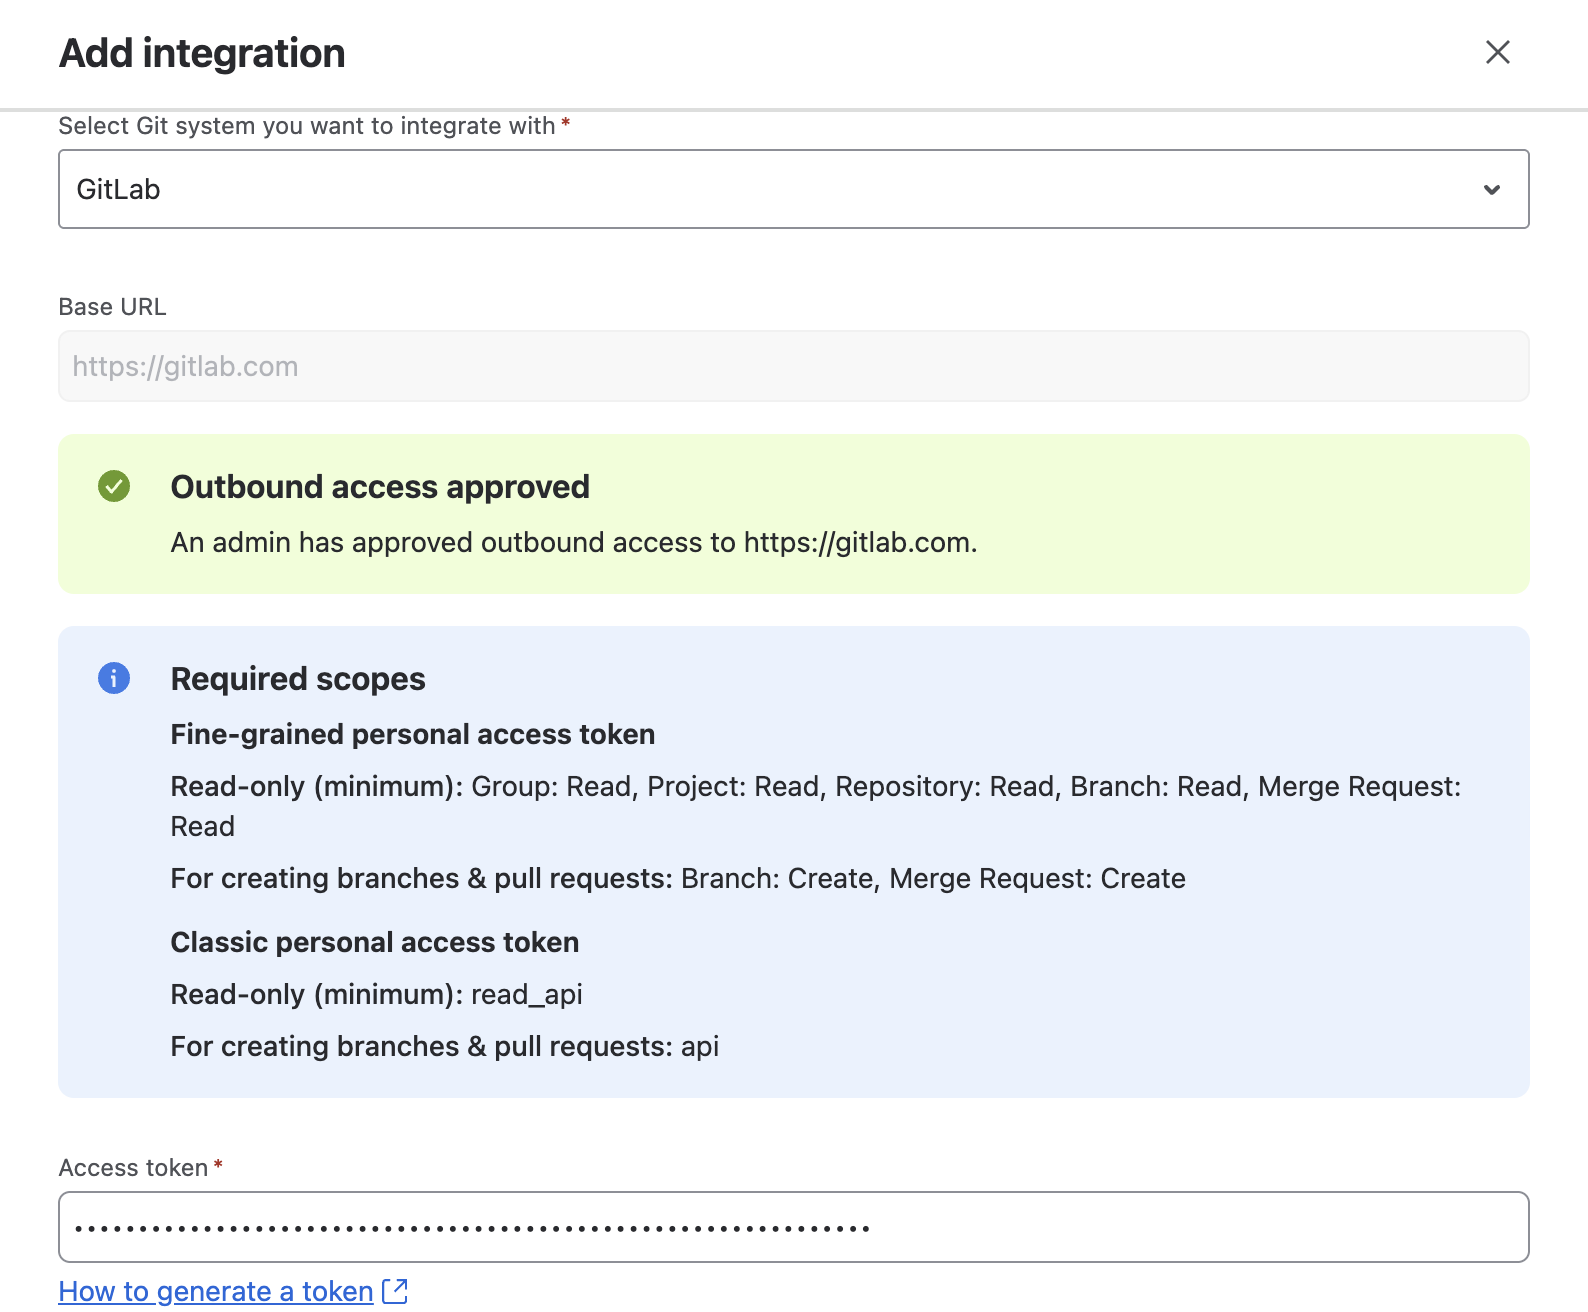
Step 1: Create a GitLab Personal Access Token
-
In GitLab, go to User Settings > Access Tokens (or your Group/Project's Access Tokens page).
-
Create a new token and grant the scopes below, based on what you need:
|
YOU WANT |
FINE-GRAINED PAT SCOPES |
CLASSIC PAT SCOPE |
|---|---|---|
|
Read-only (index branches and merge requests) |
|
|
|
Also create branches/merge requests from Jira |
above, plus |
|
|
Also register a webhook (see below) |
above, plus |
|
You don't need to work these out yourself - the Add integration form in Jigit shows the exact scopes required, based on the integration type and options you select.
-
Copy the token.
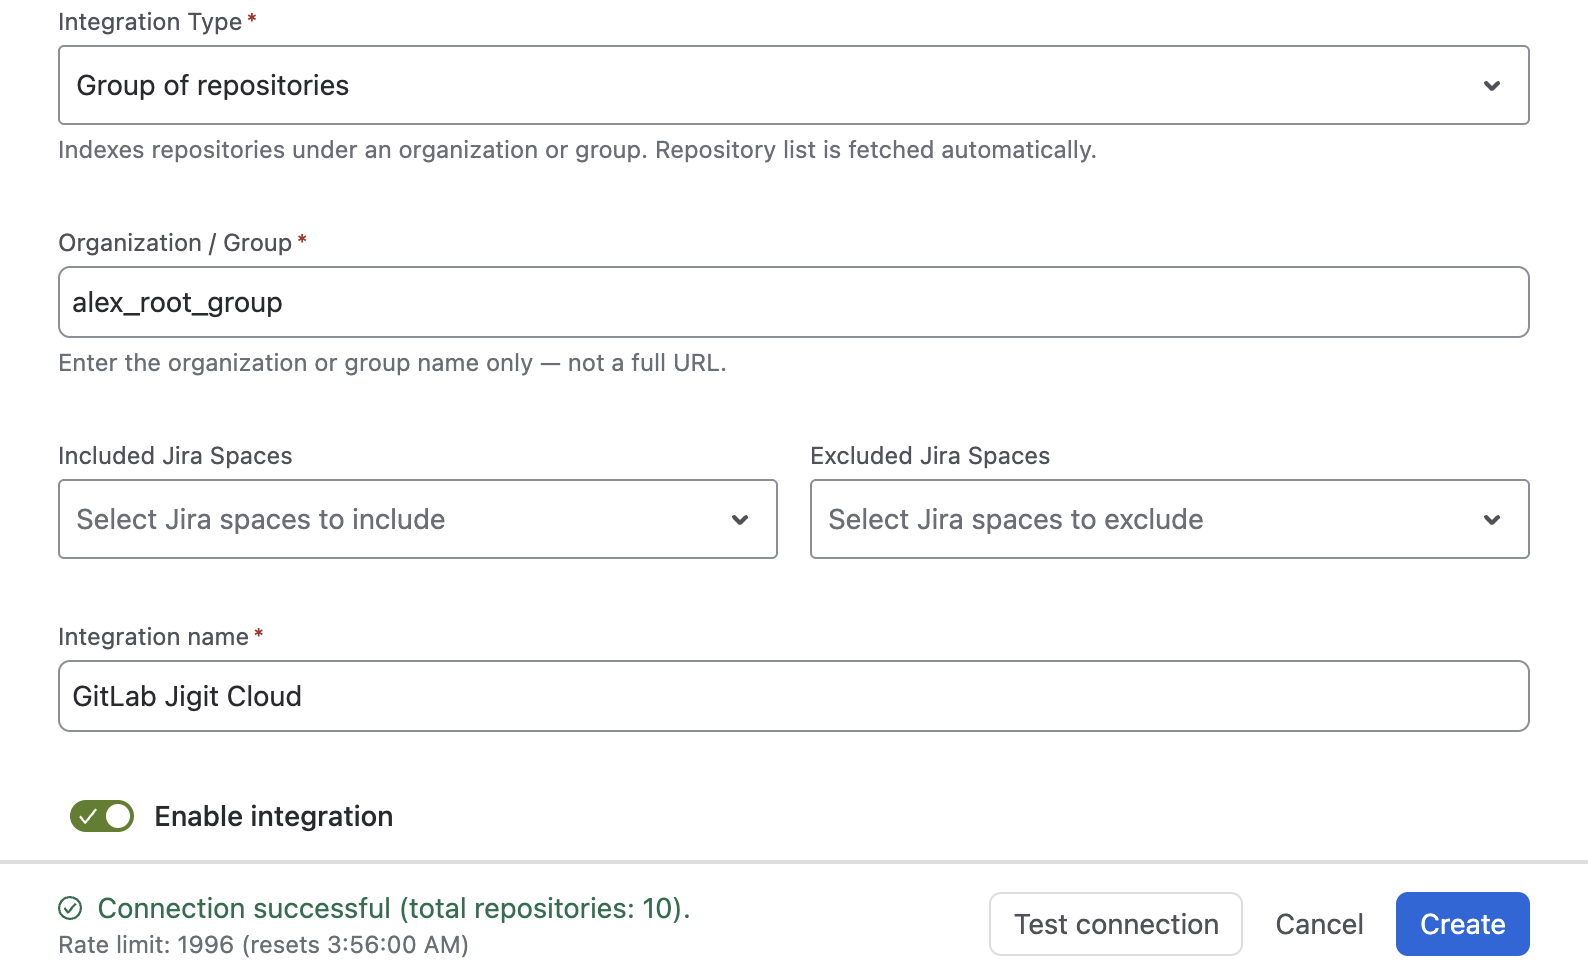
Step 2: Add the integration in Jigit
-
Navigate to Jira Administration > Apps > Jigit > Integrations.
-
Click Add integration.
-
Set the Git system to GitLab.
-
Choose the Integration type: Group or Repository.
-
Enter the Base URL - this must be
https://gitlab.com. -
Enter the Path - the group path, or the
namespace/projectpath for a single project. -
Paste the Personal access token.
-
Click Test connection.
-
Click Create.
Configuring webhooks
By default, Jigit indexes branches and pull/merge requests on a 20-minute poll. Enabling webhooks lets updates flow in as they happen instead of waiting for the next poll - the poll keeps running in the background as a safety net, so nothing is missed if a webhook delivery fails.
Step 1: Turn on webhooks globally
-
Navigate to Jira Administration > Apps > Jigit > Settings.
-
Under Git webhooks, turn on Support Git webhooks.
-
Enter a Webhook Secret - this is required once the toggle is on, and is used to verify incoming webhooks (an HMAC signature for GitHub, a token header for GitLab).
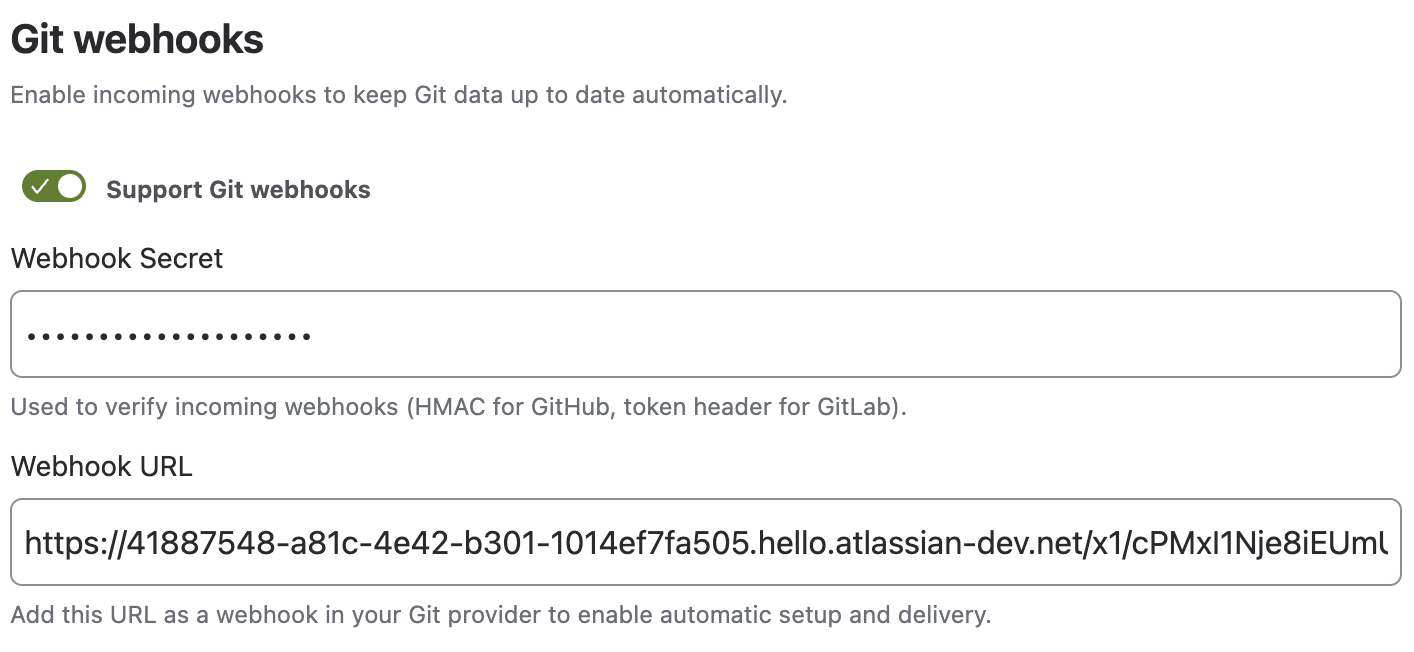
The Webhook URL field shown here is for reference. You don't need to copy it into GitHub or GitLab yourself - Jigit registers the webhook with your provider automatically (see Step 2).
Step 2: Turn on webhooks for an integration
-
Open an existing GitHub or GitLab integration, or create a new one.
-
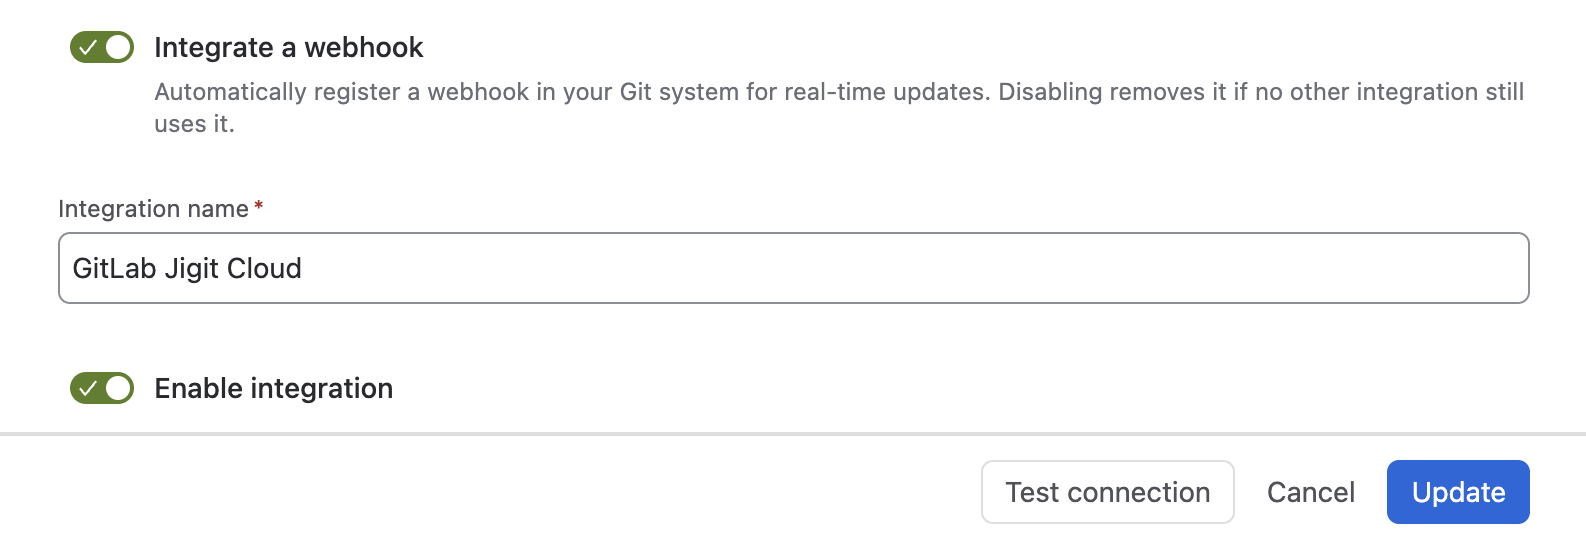
Turn on Integrate a webhook. This option is available for both GitHub and GitLab integrations, and only appears once webhooks are enabled globally.
-
Make sure the integration's token has the extra scope needed to register a webhook (see the table below) - Jigit registers the webhook with your provider's API automatically, so no manual setup is needed on the GitHub or GitLab side.
-
Click Test connection, then Save.
|
PROVIDER |
AUTH TYPE |
EXTRA SCOPE NEEDED FOR WEBHOOKS |
|---|---|---|
|
GitHub |
Classic PAT |
|
|
GitHub |
Fine-grained PAT |
Organization/Repository webhooks: Read and write |
|
GitHub |
GitHub App |
Webhooks: Read and write (App permission) |
|
GitLab |
Fine-grained PAT |
|
|
GitLab |
Classic PAT |
|
Removing a webhook. Turning off Integrate a webhook removes the registered webhook, unless another integration still points at the same GitHub repository or GitLab project.
If registration fails, a banner on save and a tooltip on the integration's status badge show the error returned by GitHub or GitLab directly - for example, a permission or authentication problem. Check the message shown and confirm the token has the scope listed above.
Integration statuses
|
STATUS |
MEANING |
ACTION |
|---|---|---|
|
Active |
Integration is running normally. Indexing runs every 5 minutes. |
None required. |
|
Disabled |
Integration has been manually disabled. |
Toggle the enabled switch to reactivate. |
|
Rate limited |
API rate limit was exceeded. Jigit resumes automatically when the limit resets. |
Wait for the reset, or (GitHub) switch to a GitHub App for higher rate limits. |
|
Failed |
An error occurred (invalid credentials, repository not found, etc.). |
Update credentials or the path, then save. Jigit retries on the next scheduler run. |
|
Unsupported |
Migrated from Data Center with a provider that has no Cloud equivalent (Azure DevOps), or a self-managed GitLab instance (Cloud supports |
For Azure DevOps, use Azure DevOps for Jira. For a self-managed GitLab instance, there's no Cloud equivalent. If you migrated a |
Delete Existing Data from Integration
This action removes all indexed pull requests, branches, and selected repositories associated with the integration. The integration configuration itself is retained.
The deletion is performed as a background process and may take some time to complete, depending on the amount of indexed data.
This action cannot be undone. Once deleted, the indexed data must be re-synchronized if it is needed again.
Viewing Git data in Jira
-
Open a Jira issue.
-
Find the Jigit Development panel in the right-hand sidebar.
-
The panel lists linked pull requests and branches, including their title, state, and repository name.
Settings
Global settings apply across all Gerrit configurations and GitHub/GitLab integrations.
|
SETTING |
DESCRIPTION |
|---|---|
|
Included Jira spaces |
Global include list. If set, Jigit is only active for these Jira project keys. Takes precedence over per-integration include settings. |
|
Ignored Jira spaces |
Global ignore list. Jigit does not display data for these spaces, however indexation still occurs. |
|
Branch naming patterns |
Patterns for generating branch names from Jira issues. Placeholders: |
|
Link branch action |
When enabled, a Link branch action appears on Jira issues. |
|
Link change request action |
When enabled, a Link change request action appears on Jira issues for creating or linking a Gerrit change. |
|
User authentication strategy |
Controls whether users must connect a personal GitHub account. No (default), Required, or Required for action. |
|
Allowed Git systems |
Restricts which Git provider types can be added as integrations. Defaults to GitHub only. |
|
Support Git webhooks |
Enables near-real-time updates via GitHub and GitLab webhooks, alongside the existing 5-minute poll. Requires a Webhook Secret once turned on. See Configuring webhooks above. |
|
Migration secret |
Passphrase used to encrypt credentials in a Data Center export. |
User Git Connections
Individual Jira users can connect their own GitHub accounts to Jigit. Data is then displayed based on the user permissions, rather than the integration authentication. This is only mandatory when the User authentication strategy in Settings is set to Required or Required for action.
Users access this page via Profile menu > Jigit Git Connections, or from Apps > Jigit Git Connections in the Jira sidebar.
|
Method |
Description |
|---|---|
|
OAuth |
Connect via GitHub OAuth. No manual token handling required. Available when the integration is configured to support OAuth. |
|
Personal Access Token |
Paste a GitHub PAT generated from your GitHub account settings. The token is stored securely. |
Personal user credentials are not migrated from Data Center. After a migration, users must reconnect their accounts via this page.
Related pages
-
Supported Git Providers and Feature Comparison - full list of supported Git providers and feature comparison with Data Center
-
Jigit - Migrating from Data Center to Cloud - how to move your existing Jigit configuration from Data Center to Cloud
Updated: September, 2026