

Jigit is a Jira application for Jira On-Premises that provides an issue view tab, which displays information about all commits referencing the issue key. Additionally, Jigit provides a development panel on the Issue View screen where a person can see the issue-related branches and create a new branch directly from the source code.
Jigit gives you a convenient way to collect commits and pull requests from GitLab and GitHub. Jigit queries Git servers using their public REST APIs and saves commits into a Jira database so there is no access needed. The app uses only the commit history.
The App does not have access to your source code. It doesn't clone your repositories, so no disk space is used to store sources. It uses REST APIs to query data.
Jigit Plugin Configuration
To start the Jigit plugin configuration you have to generate Access Tokens.
How to generate Personal Access Token in GitHub?
How to generate Access Token in GitLab?
Once your Access Token is ready you can move to the integration set-up.
-
Move to the Jira Administration section (“gear” button in the right corner of the navigation menu).
-
Navigate to the Manage app page and find our application Jigit Plugin Config on the left sidebar.
-
From the Configurations tab, click

-
After specifying all the necessary parameters, click the Save button.
-
The Test connection button lets you check the connection and communication between Jira and the linked GitHub or GitLab instances.
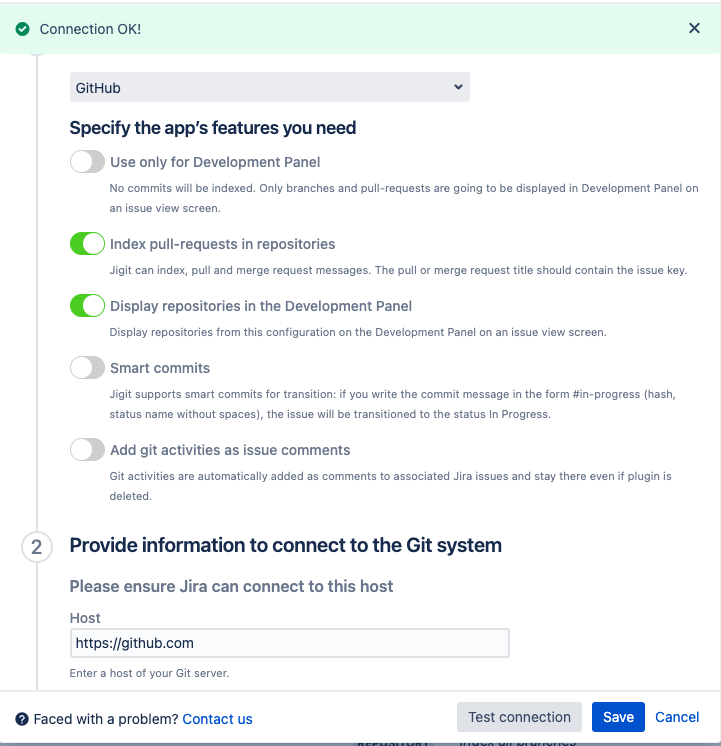
Below you can find a short definition of each parameter you have to specify in the modal window that appears in front of you:
|
Parameter |
Definition |
|---|---|
|
|
specify the Git system for your connection; Azure DevOps, GitLab, GitLab 8 or earlier, GitHub or GitHub App |
|
|
select to prevent commits from being indexed. Development Panel on issue view screen will only display branches and pull-requests. |
|
|
Available since 4.12.19 Jigit can index, pull and merge request messages; when this parameter is enabled, the integration will actively monitor and index the pull requests in your repositories. The pull or merge request title should contain the issue key. For instance, DEV-123 added support for pull requests indexing for GitLab and GitHub. |
|
|
the visibility of repositories to be able to сreate a branch, link a branch to the Jira issue, and сreate a code review using Jigit Development Panel. |
|
|
Available since 3.04.01 allows you to enable or disable the use of smart commits; Jigit support for smart commits for transition: if you write the commit message in the form #in-progress (hash, status name without spaces), the issue will be transitioned to the status In Progress. The smart commits work similarly to the Bitbucket Smart Commits. It works only if your workflow does not have any mandatory fields on transition. |
|
|
when enabled, Git activities, such as commits, pushes, and merges, are automatically added as comments to associated Jira issues. After a commit is added, the operation can't be reversed. Comment stays there even if plugin is deleted. |
|
|
enter a host of your Git server; it can be https://github.com, https://gitlab.com, https://dev.azure.com or your instance on the GitLab server (for example, https://my.own.gitlab:8443). Also, you can create a GitHub app and use it to get access to Github, the app needs to have the necessary permissions. Important: After you change GitHub app permissions you need to make sure it was reinstalled on the organization level and the permission-change was accepted by the organization admin/owner. |
|
|
path; it can be either a repository name or a repository group (GitLab) or organisation (GitHub) name; a repository name usually consists of two parts and is displayed in the query string of a browser. For example, in the URL https://gitlab.com/gitlab-org/gitlab-ce the name of the repo is gitlab-org/gitlab-ce and the group name is gitlab-org. For Azure DevOps integration, in the URL https://dev.azure.com/Move-Work-Forward/BTR%20project/_git/MWF the name of the repo is Move-Work-Forward/BTR%20project/_git/MWF and the group name is Move-Work-Forward or Move-Work-Forward/BTR%20project. Also, you have to specify the content type inside a given path: repository or a group of repositories (drop-down opposite the path) Subgroups are only working with GitLab. |
|
|
The default branch of your GitHub or GitLab repository that will be used for integration with Jira, by default it is indicated When you use Test Connection action, it uses the default branch and the first accessible repository to check the connectivity. |
|
|
authentication token you created before that allows an individual user to authenticate and access GitHub resources. Service accounts are often used for this purpose. |
|
|
a way of branch indexing:
The aim is to decrease the number of API calls if this number is limited (it's actually for https://github.com, for example). If you select the "all branches" option, Jigit makes API calls to check whether there have been new git commits since the last check (even to stale branches). |
|
|
Jira project names list where the commits and pull requests should be visible |
|
|
lets you to specify a time duration after which smart commits should be ignored |
|
|
allows you to manually change the default settings for indexation |
|
|
a time period within which commits are indexed and associated with Jira issues |
|
|
the maximum amount of time allowed for making a request to retrieve commit information from the connected GitHub or GitLab repository; this parameter is used when Jigit calls the git server by HTTP API, and if the timeout is exceeded during a call the add-on stops the indexing of a repository. If you see ConnectException: Connection timed out in JIRA logs, you can increase this value to overcome it. Default and recommended - 10 seconds. |
|
|
the duration of a pause or delay between consecutive requests made by the integration to the connected GitHub or GitLab repository Default and recommended - 10 seconds. |
|
|
frequency at which the integration checks for new commits or changes in the connected GitHub or GitLab repository Default and recommended - 100 requests. |
|
|
indicate an alias/name for your configuration which will be displayed on the configurations tab page; an alias should be unique; you can't add two configurations with the same alias. |
|
|
enables the configuration to allow indexation |
Here is a quick demo video of how to connect Jira to GitLab using the Jigit app.
Once the configuration has been created, you can start using the app on the Jira issue view screen. The other configurations are optional to make your integrations more streamlined and efficient.
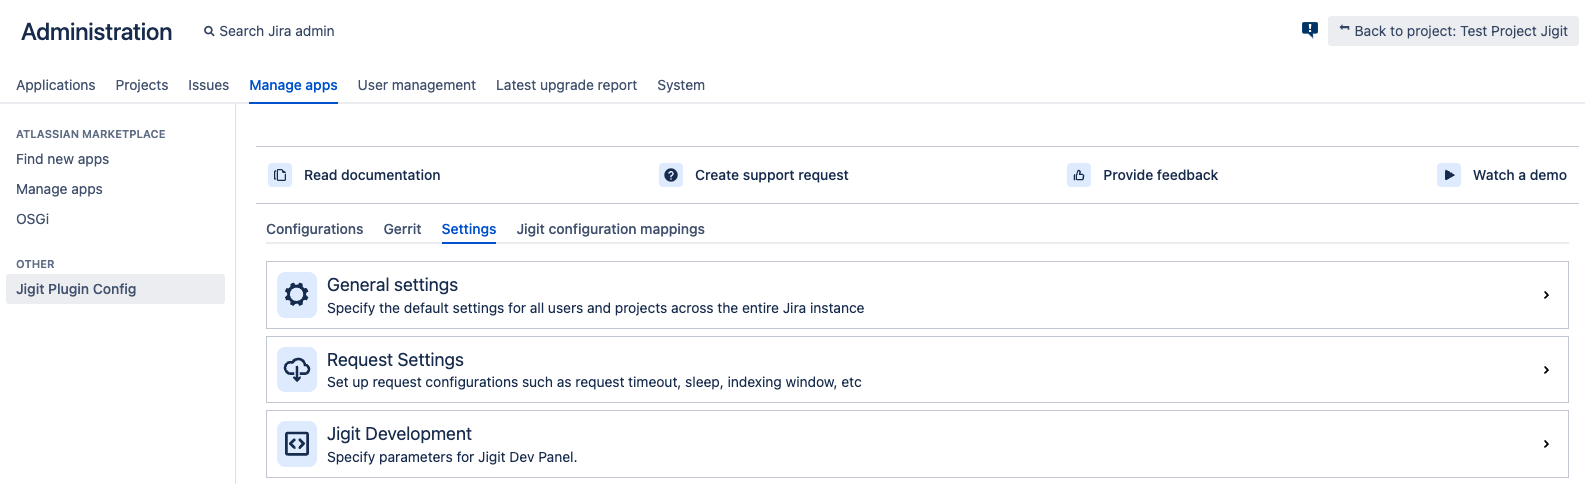
Settings
The Settings tab allows Jira administrators to configure and customize the integration settings. Those settings include:
-
General Settings: default settings for users and projects across the entire Jira instance
-
Request Settings: adjust the indexation request configurations
-
Jigit Development: allows you to configure Development Panel parameters
After specifying the necessary parameters, remember to click the Save settings button.
Below you can find a short definition of each parameter of Global Settings tab.
|
Parameter |
Definition |
|---|---|
|
|
Jira projects where the Jigit Tab is visible No projects chosen means available everywhere. |
|
|
Jira projects where the Jigit Tab is not visible No projects chosen means available everywhere. |
|
|
allows you to define the URL to which the Jigit can connect; by default, all URLs are allowed, but the Jira administrator can use For example, -Djira-jigit-plugin.url.pattern="https://github.com|https://gitlab.com". |
|
|
ensures that any non-ASCII symbols or characters in commit messages and pull request titles are removed or replaced with ASCII equivalents. Non-ASCII symbols refer to characters that are outside the standard ASCII character set, which includes characters such as letters, numbers, and basic punctuation marks commonly used in the English language. Examples of non-ASCII symbols include special characters, diacritical marks, emojis, or characters from other languages and scripts. |
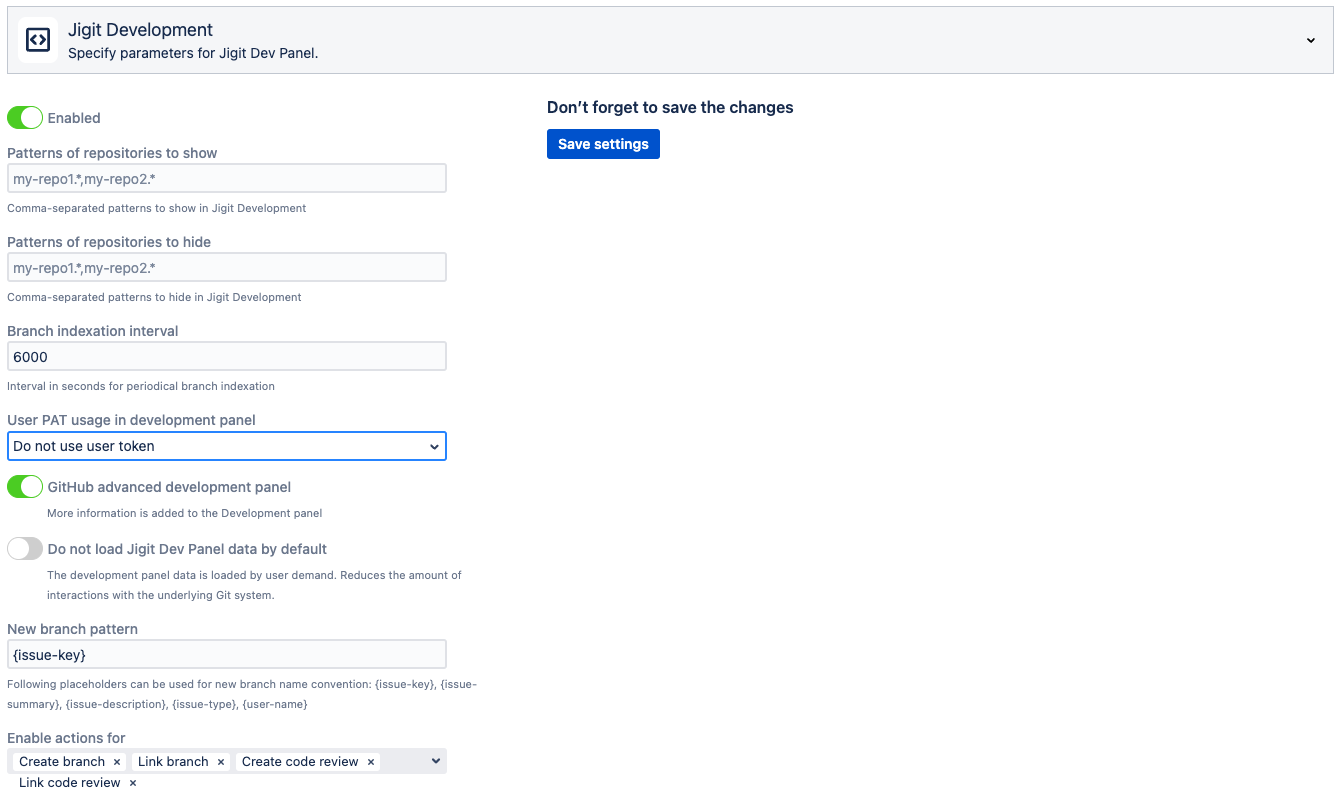
Jigit Development Panel
Available since 5.02.23
The Jigit Development Panel is a panel on the issue view screen where you can create new branches in the configured git connections and see related branches. The Jigit Development Panel provides information about branches and pull requests where the issue key is featured in the name.
For this feature to work you need to make sure the access token used in the configuration has the right permissions to do the create-branch operation.
To configure the Jigit Development Panel displaying, you need to:
-
Navigate to the Settings tab on the Configuration page.
-
Select the Jigit Development drop down
-
You can find an overview of each parameter to configure in the Jigit Development Section.
-
Click on the Save settings button to save the updated configurations.
To be able to сreate a branch, link a branch to Jira issue, and сreate a code review using Jigit Development Panel you need to enable parameter Display repos in the development panel during Jigit Plugin Configuration.
Please watch this demo video to discover more details about Jigit Development panel.
Get started guide for the Jira end user
How to link Git entities to Jira issues?
How to create a pull or merge in Jira using the Jigit app?
How to create a feature branch in Jira?
Updated: